

navigation bar


Showing posts with label Paper fun. Show all posts

Friday, July 1, 2016

#onebookjuly2016

Don't worry, I am not talking about books you read, but rather books you write in! Journals, notepads, spirals, etc.

I was nearing the end of my main bullet journal from earlier in the year and trying to figure out what to do next. I've done some mini books, had a separate journal for work, and tried a variety of sizes but wanted something fresh for summer. This post inspired me to simplify by choosing one book and one pen for the month of July.

Now the one pen rule seemed a little crazy to me, but as I watched the video, I realized the main goal was to be purposeful. To create a simple routine for a daily habit of journaling. I chose one main pen to use, but in some of my checkbox spreads, I will probably use a yellow pen or highlighter to show progress.

I scoured the bookstore and almost left with the same style i'd used previously. But as I approached the check out line, I saw a little hardbound book. The pages had dots (something I've been wanting to try!) and it was just a bit smaller than the moleskins in my hand. I decided to give it a try.


I immediately put some wash tape on the cover and started my index. I transferred my book list from my old journal and added a few titles then made a July starting page as well as some lists I need to keep track of this month.

The paper is a bit thicker than the moleskin, which i'm liking. I chose to use a Martha Stewart Crafts pen I bought ages ago at Michaels. It is "charcoal" which I think helps the ink not bleed through in the usual way. It is very similar to this style.

I still have a separate journal for book studies I'm doing, or for scripture art and sermon notes, but on a daily basis, I plan to use this little journal the most. It can go in my bag nicely or sit out on my desk and add a pop of color.

Hoping to find a good rhythm this month of documenting things and keeping track of all the lists and ideas that are flying through my head!

Share a link to your journaling story...

Monday, June 27, 2016

Bullet Journal - tracking


This week I'm trying something new. I love the look of habit trackers I've seen online, however I've never been able to follow through. I think I've uncovered two main reasons I struggled:

1. Most that I've tried are for a month at a time. I live more day to day, or week to week.
2. Their habits are often pre-established and I realize that I am in data collecting mode to help me determine what my goals need to be.

Using these insights, I decided to take one area that I want to figure out: water intake. I made a chart for just this week (Monday-Saturday) and a box for each glass of water I hope to drink each day. There is also room on the end of each row to make a note, should I somehow go beyond the 8 boxes.

Below the chart (not pictured above) I journaled. I wrote what I already know to be true (a glass in the AM and a glass in the PM just to get my vitamins down). I also know that during school I'm a bit more regular about water so summer always takes a bit of routine adjustment. I set what I think is a reasonable goal and then added how I'm hoping to figure out what my "normal" is and look for patterns or places to make adjustments. 

I plan to recap next week what I discovered and see if this helps me on my way to developing good habits while documenting my efforts and feeling accomplished, even if some boxes are left empty.

Do you track goals? What's your method?

Saturday, June 25, 2016

Idea web


A few summers ago I got the ideas to make a list of fun summer activities I hoped and dreamed to accomplish. I also, however, didn't want to be disappointed if I didn't accomplish things on my list. Summer should be about fun and freedom! A list feels very much like "work" to me, something I need to address daily and be sure to complete. 

To keep things fun, I created the "Summer Idea Web," where things are added at random and adorned with drawings and other fun graphics to keep the pressure off. Here is the start to my 2016 list!

I also found this neat downloadable list that is a bit more of a check list. I like that it has a column for who requested the activity, which helps tell the story behind the list.

Perhaps I'll try each this summer and see what happens! Goodness knows there are plenty of organizing projects I have hopes of completing, so a separate project list may come in handy! Last summer before the little one comes is looking to be full of fun and accomplishments.

Happy summer planning! 

Monday, January 18, 2016

bullet journal

I just bought a few new moleskin journals and am trying out bullet journalling for the first time. I'm excited to see how it influences my other journals. Can a person have too many? Here's my current rotation of journals:
  • meal planning/recipe journal
  • school meetings journal
  • church meetings journal
  • journal just my notes and thoughts on "The Fringe Hours" book
  • bible study journal
  • sermon/scripture doodling journal
  • bullet journal

It seems like a lot when I list it out in that way but I love that each one serves a specific purpose. It's quick and easy to grab my bible study journal and know that everything inside is what I may need.

Enter the bullet journal. This is not new, but I finally decided to dive in a try. I highly recommend watching the video a few times to get a feel for the foundational purpose/structure. Then you can adapt as necessary. Seth and I each got a journal and sat down at the bookstore to get set up. I'm interested to see if this becomes complicated for me since there is a lot of crossover between work and home tasks. I don't really have a good bag/purse system currently so it is rare for me to consistently carry anything other than phone, wallet and chapstick. For now the bullet journal lives on my desk so I can check it in the morning and evening. On a rare occasion where I'll be out and about after work, I'm planning to bring it with me so I can work in it between appointments.


Have you tried bullet journaling? Do you have a different method you prefer? I am eager to see my stacks of sticky notes condensed into one place so i'll keep you posted on how it goes!


sermon doodling

A day late but I have so many doodles to share!

Lately I've been taking to writing out the scriptures we reference on Sundays. It's kind of a big commitment as our pastor prefers large sections of scripture, but I'm really enjoying it for a few reasons:

  1. It's scripture - can't go wrong!
  2. It makes my brain slow down and think about each word of the passage, which usually helps me see patterns and things I might miss with a single run through.
  3. I want to be in the word more often and this is a fun way to dig in deep!
This first doodle is from lectio divina. As I was writing I realized the word "remain" pops up a LOT in this passage. I went back and highlighted each. I also like to write the verbs or descriptors in a way that stands apart. Since the passage was long and I had limited time, i kept to a simple print and just added cursive words as they stood out to me.


This one is also a longer passage from the sermon a few weeks ago. I went back with different colors to highlight certain words/phrases.  Nothing super fancy, but that also makes it easy to look back over later. 


I chatted at length with a friend the other day about this style of note taking/reflecting. It was fun to show her how sometimes I keep it simple and most always there will be a "mistake" somewhere. It's freeing to know that it can be as simple or complex as feels right for the moment!

happy doodling :)


Saturday, July 18, 2015

Scripture Art

I've been trying to keep up a May goal for memorizing scripture. Writing it out always helps me so here is one of my verses from last month. 


I love picking different fonts to highlight certain words or phrases. 

Thursday, July 9, 2015

Digital Art Project no. 2

A few weeks ago the youth group went on a mission trip. I wasn’t able to join them but to offer my support, I made them a devotional guide for their reflection time.

It was the perfect little project to help me feel supportive and to equip the kids process what they experienced. We called is a Missional Learning Trip to help them focus on learning from the people they worked with and not just on the physical work we did at the farm.

The youth director gave me free reign so I chose a simple half fold booklet style with lots of space to journal and doodle. The arrows are from a free digital download online and the fonts I used are as follows:

Cover Title, Day #: Reprise Title (from Sibelius music program)

Cover Script: Sunshine in My Soul

Daily Schedule, Bible Verses, Reflection Questions: American Typewriter (free with Mac, similar to Courier New)


The format here is how I created it in Pages. Each page was printed double-sided and then they were stacked, folded, and stapled down the middle. Super simple (once you figure out the order of the pages)!


I love these types of projects and heard that at least one student really enjoyed the chance to reflect on the verses and the daily events.

Friday, July 3, 2015

Sermon Notes

Today I want to share about my newest way to create. It is summer heat friendly and portable for traveling!

I spent the last two weeks of June on the computer for about 8-10 hours a day. Not the fun computer stuff like blogs and twitter, but hard-on-the-eyballs computering. Though a few minutes a day were spent on fun side projects, it was mostly one monstrous project and I promised myself that upon finishing, I would take a few days off from the computer.
So Sunday morning I found myself up early and ready to dive into summer. I've been inspired a lot lately by illustrated faith. I decide to listen to one of my favorite sermon podcasts. I've been trying to find in on a tangible way to process what is being preached and reflect on what hits home for me and this is what I came up with. I wanted a place where they would all be together and this Piccadilly Journal is something I've only used a few times over the last 5 years (entry one is from Dec. 2, 2010). I think good notes should be something you want to look back at later.

Enough words, picture time!
Sermon #1

I took notes! Only I took them in a way that was visually stimulating and in some cases reflect the meaning or message. I love that the sermon series we just started is called "off the chain" because it was really very freeing to just draw, write, listen, and see the words form.

I loved the mental challenge of mixing it up but making it cohesive. I loved the moment of flexibility when I realized I was almost out of room and there were 2 more points to be made!

Sermon #2:
I've been playing with color and different typeface, figuring out what makes the most sense in the moment. Admittedly more than once on this page I had to pause the podcast to finish a detailed section. Not practical for realtime note taking, but I'll work on that.

The most important part to me is how this helps me internalize what I heard. I am a visual learner and by drawing out my notes I can recall the info more easily. For some people this is not an organized way of taking notes and depending on the situation, I too am all for indents and bullet point. But for me, I remember drawing the swirly arrow to symbolize deployment and that "rock the mic you got" is a reminder to live out your calling confidently. When someone mentioned wanting to hear my story I referenced my notes saying "I wrote something about the importance of story in purple near the center binding going vertically." When I pulled about the book, there it was:
there's incredible power in your story
I will certainly still doodle in my journaling bible, but for now i'm also enjoying the large blank space to freely write and document!

Thursday, July 2, 2015

Digital Art Project no.1

A colleague and friend of mine is moving away so we decided to put together a book of notes and bible verses for her. To fancy them up I digitized most of them so there was a cohesive look to the book. I broke my project down into 4 steps that I use with most digital project, with examples.

Choose a Size
For this project I chose to make each card 4”x6” because:
  1. I could use a photo album to put the cards inside, and she can add photos to it in the future
  2. This is a standard size of index card/photo paper for people to make their own cards if desired.
  3. I could print 2 cards per 8.5”x11” sheet of paper or 6 from a 12”x12”
Choose a Format
The idea for the cards was for people to share a bible verse and possibly a personalized note to her or about why they chose the verse so I broke it down into these parts:
  1. Bible Verse Location (ex: John 3:16)
  2. The verse
  3. Personal Message
  4. Signature
Choose 2 Fonts
Two fonts is a standard in the typography world (at least from my experiences). Typically you choose one with a serif and another without. Free Fonts are easy to find with a simple internet search.

  • The Message: I chose my friend’s favorite font (KG Beneath Your Beautiful) for the personalized notes because it looks handwritten. 
  • The Verse: Rather than choose a serif I decided to go for clean lines since the other font is rather busy. I simply varied the size of the font for the “title” so that it stood out a bit from the verse.
  • Signature: I ended up choosing a third font for the name so it looked like a signature. Breaking all kinds of rules here but it’s good to do it with intention :)

Choose Decorations
I wanted the book to have soft summery colors since it would be given to her in June, also the same month her first baby would be born. Here is the fun part! Pinterest and the internet are your friends here. Ready to get technical? Search for “free water color images” or “free digital scrapbooking art” and that’s it! In browsing you’ll see that there are many different templates and images available for your use. Once you download them, you can copy and paste the images into your document. Since this was a gift and not something I sold or made in mass production, I could use the images for free. The way I put them into my document is to make them an image that does not cause wrapping. In my program it looks like this and I will choose "None" at the bottom of the list which shows the image behind the text:
That way I can size it how I want, change the opacity and then put it behind the text. I try to not have too many words overlap so the image doesn’t take away from the message, but in some cases by making the opacity a low percentage (25% or so) I could make it faded enough to compliment the text. Perhaps a tutorial on this in the future, but hopefully that gets you started.

Here's a screenshot showing each of the elements I chose and the fonts/sizes I used.
So with a few text boxes made 4”x6” and some images layered underneath I was able to create beautiful cards for her book. I could’ve bound them into a mini book or put them in a box but this project seemed best in an album.


I’m excited to share some other digital art I worked on this spring including date night cards, a devotional and an end of the year gift for my students! Happy creating!

Tuesday, June 30, 2015

Bible Journaling

Have you seen this yet? It's art and your bible mushed altogether!

I used to have a sunday school teacher who CRINGED at the thought of writing in a bible. When I got to college and the bible teacher told us to make all over the place I was so nervous. But that class really opened my eyes to what a fun story it can tell. Having help various ministry positions, and being active in church since I was a kid, I've inherited a lot of different bibles. Not one of them is the same translation another, which I especially cherish.

So, in deciding to try this illustrated faith idea I realized that buying another bible was not the first option. Perhaps, down the road, but for trying something new, let's see what I've got! As I flipped through each one i discovered treasured notes, some written into the bible and others on slips of paper, receipts, napkins etc. and tucked inside. Almost every single note sparked a memory. One of the bible still had the receipt from when I purchased it in 2003 at our local christian bookstore (sadly gone for year now). I remember going in there and choosing that exact bible for it's size and translation: New King James Version. Why that one? Not really sure except that I didn't have it yet and it maybe was recommended to me by the youth director I was interning under. I dragged this bible all of the place on many adventures. It traveled with me to France and through Germany to Switzerland. It has notes from the small group of 7th graders I led and from Sunday morning worship services I planned.

Each of my bibles has a special story as well but this one seemed perfect for this project. It was already laden with notes and underlines and I loved the idea of adding layer upon layer of notes and images. It made me think of a wall that's been painted and repainted many times. Each layer add character and texture and are a part of the story even when hidden beneath new layers.
The bible is about 4"x6" and I used colored pencils with a regular ball point pen to draw. I mostly used scripture sunday verses to draw or my scripture cards from naptimediaries.com for inspiration. Reading through the verses and context gives me the ideas and sometimes it's just a matter of highlighting the part of the verse that stands out to me. I'm enjoying the process and seeing where it takes me! Check out #illustratedfaith to see other people's art. There are amazing artists sharing their work!

Saturday, March 14, 2015

happy mail


Ever had one of those late-night conversations with a friend where it's way too late, you've been talking for too long and suddenly you're asking pretty random questions of each other? I had a friend in college who asked one evening, "If you could do any job in the whole world and not worry about making money or of the practice stuff, what would you do?"

That is a huge question and yet it only took me a few seconds to come up with my response.

"I'd make cards for people."

When he asked me to explain I began to share how much I love making cards. I didn't want to have a card shop or manufacture a line of cards, I just wanted to make them for people. I love picking out the papers, paints, or whatever supplies seem right for the moment. Sometimes I'm thinking of a specific person and what they might enjoy, other times I'm letting the supplies lead me down a creative path. Then I get to select a purpose (Thank You cards, birthday cards, Christmas cards or just a card to say "Hello!") and a recipient. More fun!

No doubt this love of cards and handwritten letters comes from my mom who has a similar excitement over letter writing and mail. She and I wrote so many letters back and forth my freshman year of college (all of which are currently stored in a hat box in my closet). To me, cards are little envelopes of joy and there is always a reason to send joy to people!

For years I made cards and didn't even consider an alternative. Over the years my hobbies have shifted and my time has been distributed differently. I recently started purchasing cards and building up a little stash to send to friends and family. Then I read about Happy Mail from the blog and business A Beautiful Mess. I was so excited by the idea yet hesitant to try. Would I really send all the cards? Would I like them? It's a surprise package each month so there is no control over the content you receive.

So for my birthday I decided to give it a go. I went ahead and made a goal to work with what was sent and to decide if I would continue the subscription. As of today, I'm totally hooked! A week ago I got 8 cards in the mail and I have already used 5. I have watched and re-watched the video announcing the March box! Though I'm not the one making the cards it's still totally fun because I get the privilege of sending little envelopes of joy to friends and family. And it comes in this totally cute packaging. Pure joy! Happy mail all around!


Do you send cards? Do you check your mailbox???


Thursday, May 22, 2014

sketching - westward trail view

A few days ago, with the sun streaming down and the chaos of life swirling all around, a friend asked, "Do you want to go sketching?"

I was so grateful for the change of scenery, the warm sun on my back and a creative endeavor to clear my mind. When I found this drawing on my desk I remembered the moment and I realized how important it is to have creative outlets. If our lives are busy, we must schedule in time to let our creative spirits soar. We must choose creativity.

How will you stretch your creative muscles?

Wednesday, April 16, 2014

one little word wednesday

My word this year is

choose.


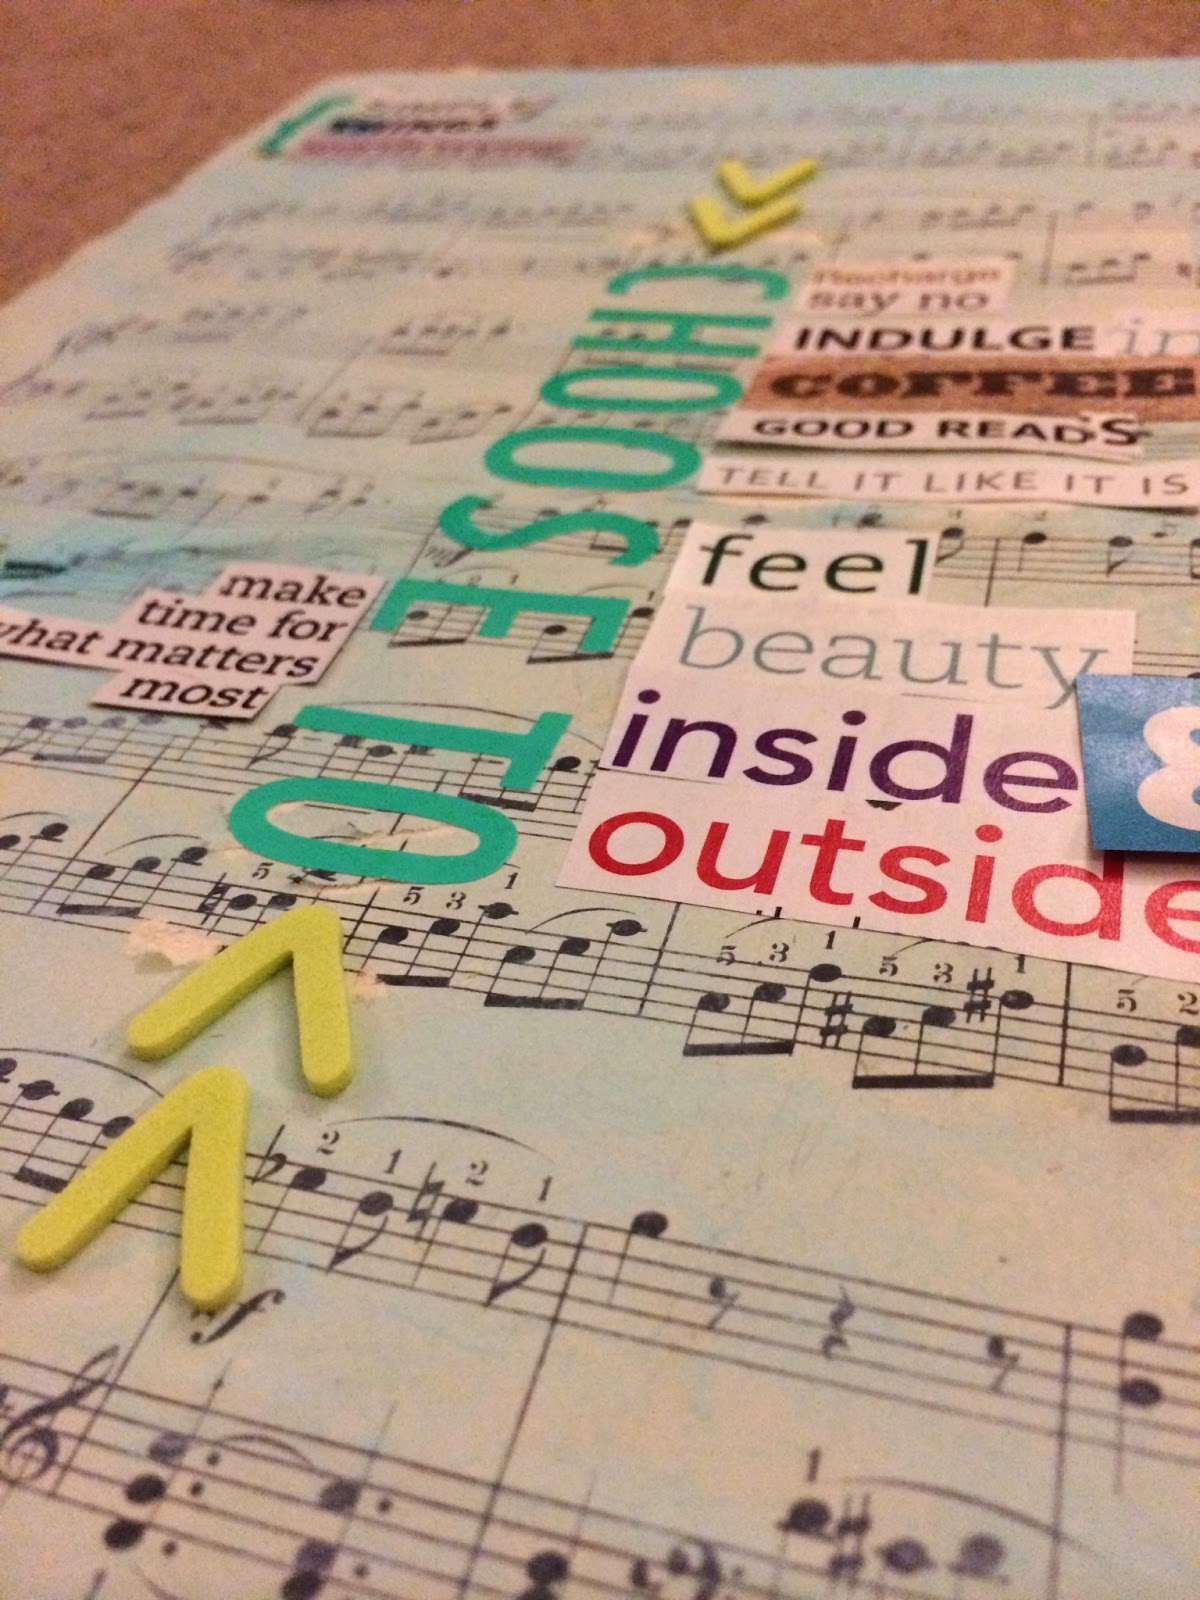
I am happy with this word. It stretches me, challenges me, guides me, supports me. Or perhaps a better way to put it is this: the word choose helps me be intentional. I did a project from Ali's One Little Word class to help me explore my word a little more. This is the simple poem I was able to craft from random words and phrases I cut from magazines. The large "CHOOSE TO" down the middle became the opening phrase to accompany each of the words and phrases I chose. Here is how I read it

simple 
things 
worth trying

choose to recharge
choose to say no
choose to indulge in coffee, good reads
choose to tell it like it is
choose to feel beauty inside & outside
choose to make time for what matters most

choose to is finding meaningful moments in the course of your busy life.


Monday, November 4, 2013

more paper circles

Remember that paper circle epidemic? It's spreading! 


I put the christmas inspired garland away for now and opted for a more neutral and autumnal option. This time I went with straight stands hanging down and thought this ruler was a fun addition.


This one only took a single page of 12x12 double sided paper. Each strand is 20 circles and the strands are adhered to the back of the ruler. 


This one is fun because it moves a bit and creates a neat shadow, so it almost shimmers.

I wonder what other seasonal paper I have. Perhaps a different shape next time??? You'll have to check back later!

Sunday, November 3, 2013

circle paper garland


Lately I've been feeling a need to dig out the holiday spirit. I've also been itching to try my hand at a paper garland. This was so fun and easy to do, I fear there may soon be an epidemic of circle garlands around my home! What's fun is that the project cost $2 and took about an hour. Easy , right? And if you use paper from your stash, it's free!!

Hope you give it a try...

//circle paper garland//

1. Punch as many 1in circles as you can muster from 2 pieces of double sided card stock.  


2. Stitch circles into 5 strands, varying in length.  Leave extra thread at the beginning and end of each strand.  


3. Arrange strands according to length and tie ends together. Drape on the wall for a festive holiday bunting!